Chào các bạn với Bài
viết này mình nhận được
rất nhiều ý kiến đóng góp của các bạn. Hôm nay mình xin tổng hợp update CSS cho
blog yahoo mới rất mog được sự ủng hộ của các bạn.
Viết blog là sở thích, có người thích chia sẻ cảm xúc,
có người lại muốn giấu cảm xúc vào blog. Mình tin rằng blog giống như ngôi nhà
thứ 2 của bạn vậy, hầu hết ai ai cũng muốn làm đẹp song lại ko biết phải làm thế
nào???
Lấy theme mà các bạn tốt bụng share làm nhà cho mình
cũng là một cách, song nó ko thể hiện được hết cá tính của chủ blog.
Theo mình blog đẹp cần sự phối hợp của
Code + photo + Flash + Color.
Code sẽ là phần cứng giống như cái khung. Có code rồi
các bạn tùy biến code bằng cách chèn ảnh, them màu, tạo viền…….
Blog có quá nhiều chữ quả là nhàm chán, để blog sinh
động hơn các bạn nên tối đa hóa bằng ảnh, kết hợp ảnh tĩnh và ảnh
động.
Để các bạn chủ động hơn trong việc tùy biến code mình
hướng dẫn đơn giản về 2 thuộc tính cơ bản của CSS được sử dụng trong code là “
Background-nền” , “Text-chữ” và “hover- hiệu ứng”
+ Thuộc tính background là quan trọng nhất bên trong nó
có thể thêm thắt nhiều thuộc tính khác.
Mình lấy 1 ví dụ rồi phân tích:
<style>
#article-top-nav {background:transparent url(http://i1118.photobucket.com/albums/k618/kenkoloi/posttop.jpg)
no-repeat center center;border: 2px solid #FF0000;}
<style>
Phân tích các thuộc tính đi kèm CSS trên:
-Transparent là màu nền
khi ảnh của bạn ko phủ kín được module. Transparent là tên đặc biệt nghĩa là ko
màu. Bạn có thể thay màu bằng tên tiếng anh của nó ví dụ: black,
white, blue, green…. Hay bằng mã màu như:
#00FF00
-
http://i1118.photobucket.com/albums/k618/kenkoloi/posttop.jpg
là link ảnh cần được thay thế
- no-repeat
là một thuộc tính có thể thay thế bằng:
Repeat: lặp lại
Repeat-x : chỉ lặp lại theo chiều ngang
Repeat-y : lặp lại theo chiều dọc
Các
bạn nên sử dụng repeat hoặc no-repeat thôi nếu chưa hiểu
dõ
- center center : là
vị trí đặt ảnh. Có thể thay thế bằng:
Center center: đặt giữa và bắt đầu từ giữa
Center top : đặt giữa căn bắt đầu từ trên xuống
dưới
Center bottom: đặt giữa bắt đầu từ dưới lên
trên
-border: 2px solid #FF0000 khi mà nền của bạn chưa có
border bạn chỉ việc chèn thêm thuộc tính border đi kèm background.
Nếu bạn muốn có thì sử dụng như trên.
2px là độ rộng viền. bạn thay 2 bằng bao nhiêu tùy
ý
Solid là kiểu viền. trong bài viết có list các
loại viền.
#FF0000 là màu viền . ta tra bảng mã
màu.
Bỏ border ta dung code:
border:none;
*Text:
Ví
dụ code:
<style>
body{color:#40FF00;font-family:Palatino Linotype;font-style:italic;font-size:18px;text-decoration:blink;}
</style>
Cơ
bản của text là color; font-family, font-size; font-style
Color:mã_màu
Font-family: kiểu font bạn sử dụng như Time New
Roman, Arial, Palatino Linotype
Font-style: là kiểu chữ : italic là
nghiêng bold là đậm muốn thêm cả 2 thì ngăn cách nhau bằng dấu
“phẩy” italic,bold
;Text-decoration: blink; thêm dòng này để
cho chữ của bạn sẽ nhấp nháy
Cách viết gọn code trên như sau
<style>
body{font: 18px Palatino
Linotype italic #40FF00;text-decoration:blink;}
</style>
>>> các thuộc tính ngăn cách nhau bằng dấu “; “
chấm phẩy <<
Trong CSS:
Sau
dấu # là tên ID và sau dấu . là class. 1 ID chứa nhiều class.
VD:
#widget-statistic .hd {background:transparent
;}
#widget-statistic .bd {background:transparent
;}
#widget-statistic là ID
.hd và .bd là các class của ID
#widget-statistic
Lưu ý: tất cả các ID và class đều có thể
thêm background.
VD
khi bạn bấm vào chữ “kết bạn” với 1 blog nào đó bình
thường nó ra khung màu trắng. nhưng mình biết ID và class của nó mình vẫn thêm
được thuộc tính background và border của nó:
#dialog-following .hd
{background:black;color:#00FFFF;border:1px groove #FF0080;}
#dialog-following .bd
{background:black;color:blue;border:1px groove #FF0080;}
#dialog-following .ft
{background:black;color:blue;border:1px groove #FF0080;}
p/s: chỗ ghi link hình là bạn thay link địa
chỉ ảnh
p/s: chỗ ghi X là chiều rộng ảnh hay là size chữ
size chữ các bạn nên chọn từ 16-20 thôi.
p/s Y là chiều cao ảnh mà bạn vừa đặt vào.
p/s: chỗ ghi X là chiều rộng ảnh hay là size chữ
size chữ các bạn nên chọn từ 16-20 thôi.
p/s Y là chiều cao ảnh mà bạn vừa đặt vào.
1/ Thay hình
nền
|
<style>
html {background-image:url(Link_hình_nền);}
html {background-position:center
top;background-repeat:repeat;}
</style>
|
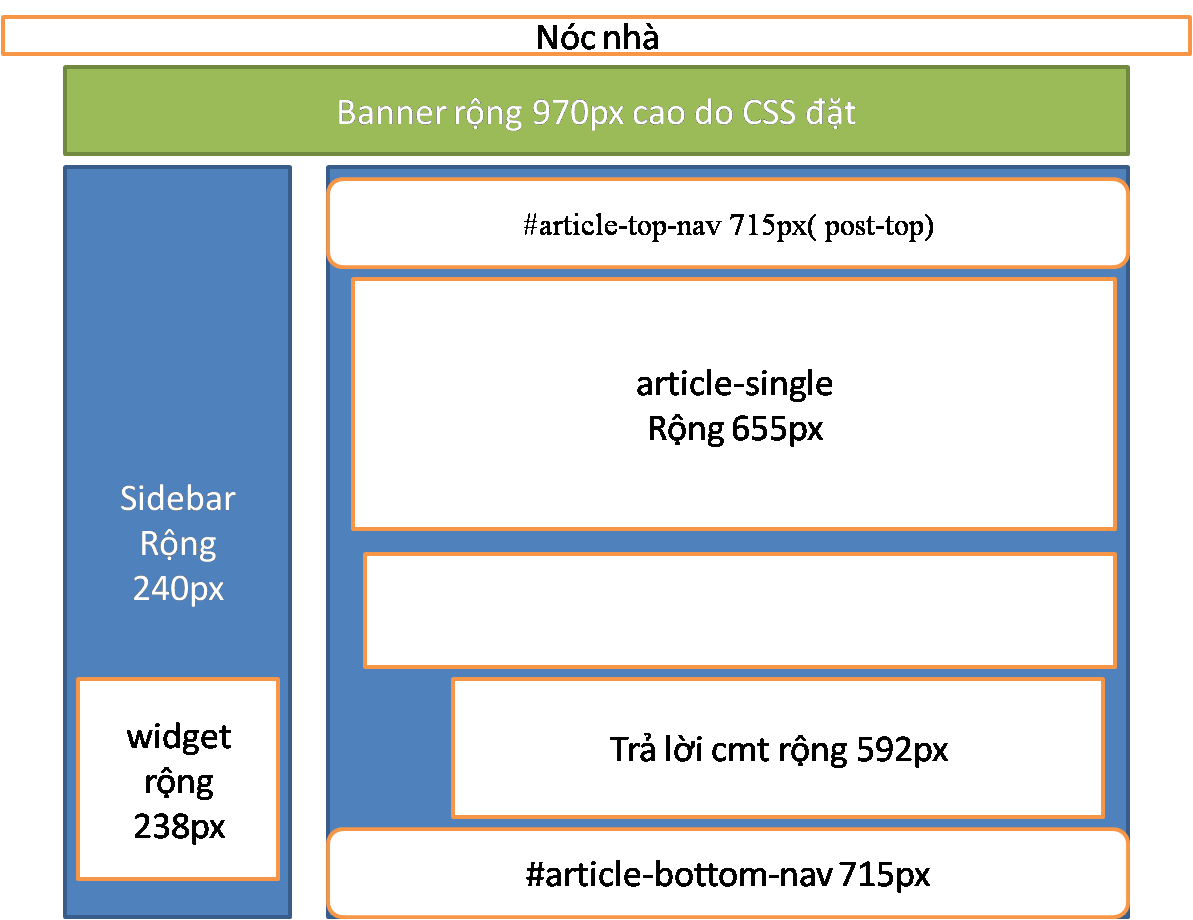
2/ Sửa Nóc
Nhà:
Chọn 1 trong
4 cách
Cách 1:
Xóa:
|
<style>
#asb-nav-update-ctn{display:none;}
#asb-nav-logo{display:none;}
#asb-header{font-size:0px;}
#asb-uh{border:none;}
#hd{border-bottom:0;}
#asb-uh, #asb-nav, #asb-nav-logo
{background-color:transparent;}
#asb-nav-search{display:none;}
#asb-nav .divider {display:none;}
#asb-nav-search
button{height:0px;width:0px;font-size:0px;}
#asb-nav-search span.search-primary, #asb-nav-search
span.search-secondary{background:transparent;}
</style>
|
Cách 2: Làm
Trong Suốt:
|
<style>
#asb-nav-update-ctn{display:none;}
#asb-nav-logo{display:none;}
#asb-uh{border:none;}
#hd{border-bottom:0;}
#asb-uh, #asb-nav, #asb-nav-logo
{background-color:transparent;}
#asb-nav-search{display:none;}
#asb-nav .divider {display:none;}
#asb-nav-search
button{height:0px;width:0px;font-size:0px;}
#asb-nav-search span.search-primary, #asb-nav-search
span.search-secondary{background:transparent;}
</style>
|
Cách 3: Thay nền cho nó
|
<style>
#asb-nav-logo{display:none;}
#asb-nav-search{display:none;}
#asb-uh, #asb-nav {border:none;height:14px;}
#asb-uh, #asb-nav {background:url(Link hình nền) repeat;}
#asb-nav li.nav-item a.nav-link{color:#Mã_màu_chữ;font-size:Xpx;}
</style>
|
Cách 4: Giống như Anrdroids chạy trên điện thoại
thanh toolbar sẽ giấu ở bên trên, chỉ hiện ra khi bạn dê chuột vào vùng
của nó
|
<style>
#asb-nav-logo, #asb-uh{background:none;border:0px none
transparent;}
#asb-nav{background-color:#cc00cc;width:1000px;}
#asb-uh{opacity:0.0;filter:alpha(Opacity=0);}
#asb-uh:hover{opacity:0.15;filter:alpha(Opacity=15);}
</style>
|
3/ Xóa tiêu đề và mô tả
blog
|
<style>
Blog-title{display:none;font-size:0px;}
Blog-description{display:none;font-size:0px;}
</style>
|
4/ Thay
banner:
|
<style>
#asb-header-ctn{background:url(Link_banner) repeat;height:Ypx;}
#asb-header-ctn img{height:0px;width:0px;}
</style>
|
5/ Thay nền
“Menu”
|
<style>
#asb-menu li.first{border:0px;background:url(Link hình nền) no-repeat;color:#mã màu chữ;}
#asb-menu li.current a{border:0px;background:url(Link hình nền) no-repeat;color:#mã màu chữ;}
#asb-menu li{border:0px;background:url(Link hình nền) no-repeat;color:#mã màu chữ;}
|
6/ Xóa bỏ phần bản
quyền.
|
<style>
#ft {font-size:0px;border-top:0px;padding:0 0 0
0;background:url(link hình nền) repeat
center;height:Ypx;width:Xpx;margin-top:30px;}
#ft p {margin-bottom:0px;}
#ft li .divider {display:none;}
</style>
|
7/ Thay màu, font, size
chữ:
Lưu ý trước:
font-family vd như arial, time new roman,…. Bạn có thể vào word chọn
Kiểu font:
italic hay bold nếu ko muốn thì bỏ phần font-style, nếu muốn vừa đậm vừa nghiêng
thì điền italic,bold
Thay cho
toàn blog:
|
<style>
body{color:#mã_màu_chữ;font-family:mã_phông;font-style:kiểu_phông;}
</style>
|
Sidebar (
module phụ)
|
<style>
.yui-b .sidebar{;font-size:Xpx;color:#Mã
màu;}
</style>
|
Màu
link:
|
<style>a{color:#Mã_màu_chữ;}</style>
|
8/ Nút home – Avatar –
Status
|
#w-profile-name{background:url(Link ảnh nút home) center
no-repeat;height:Ypx;text-decoration:blink;}
#w-profile-card
.status{border-color:#800517;font-size:Xpx;}
#w-profile-card .status .text{color:#Mã_màu_chữ;height:Chiều_cao_khung_avatarpx;}
#w-profile-card .status .text {color:#Mã_màu_chữ;text-decoration:blink;}
#w-profile-card .status {}
#w-profile-status .status-bubble
{background:url(http://i383.photobucket.com/albums/oo274/phuongle_bucket/ThemBlog/stat.png);}
#w-profile-card .status {background:url(link_ảnh động) no-repeat;}
#w-profile-img-root{background:url(Link avatar) center no-repeat;height:Ypx;}
#w-profile-img-ctn img{height:0px;width:0px;}
|
9/ Trong suốt
blog
|
<style>
#article-list, #pagination-bottom, #emotion-carousel,
#article-single.bd, #article-supplement, #article-top-nav,
#article-bottom-nav,
.yui-b .sidebar{background:transparent;}
</style>
|
10/ Thay nền cho tiêu đề
module
|
<style>
#widget-externalSource h3,
#widget-statistic h3, #widget-category h3, #widget-recentVisitor h3,
#widget-recentPost h3, #widget-followingList h3, #widget-recentComment
h3{background:transparent url(Link hình
nền) no-repeat center;text-align:center;}
</style>
|
Ảnh làm nền
mà dài quá ta thêm thuộc tính ;height:Xpx; trong đó X là chiều cao ảnh vào sau
từ cuối vd no-repeat
center;text-align:center;height:150px;}
Muốn thay
nền riêng cho từng module thì tách ra cấu trúc {background:url….} giữ
nguyên.
|
<style>
#widget-externalSource h3{background:transparent
url(Link hình nền) no-repeat
center;text-align:center;}
</style>
#widget-statistic h3{background:transparent url(Link hình nền) no-repeat
center;text-align:center;}
</style>
#widget-category h3{background:transparent
url(Link hình nền) no-repeat
center;text-align:center;}
</style>
#widget-recentVisitor
h3{background:transparent url(Link hình
nền) no-repeat center;text-align:center;}
</style>
#widget-recentPost
h3{background:transparent url(Link hình
nền) no-repeat center;text-align:center;}
</style>
#widget-followingList
h3{background:transparent url(Link hình
nền) no-repeat center;text-align:center;}
</style>
#widget-recentComment
h3{background:transparent url(Link hình
nền) no-repeat center;text-align:center;}
</style>
|
Không có ảnh
làm nền thì ta dung màu làm nền theo code sau:
|
<style>
#widget-externalSource h3, #widget-statistic h3,
#widget-category h3, #widget-recentVisitor h3, #widget-recentPost h3,
#widget-followingList h3, #widget-recentComment h3{background:#mã_màu_nền;text-align:center;}
</style>
|
11/ Thay toàn bộ icon cho
các đề mục
|
<style>
#article-listing-toggle .ico{background:url(Link icon) no-repeat center;}
</style>
<style type="text/css">/*ins ion
*/
#widget-recentPost .bd ul li {list-style-image:url(link icon);}
#widget-category .bd ul li.clrfix a
.ico{background:url(link icon)
no-repeat;}
#widget-recentComment .bd ul.force-wrap
li{list-style-image:url(link icon);}
</style>
<style> đây là phần icon cho tiêu đề bài viết
{}
#article-listing .bd .category .ico
{background:url(link icon) no-repeat;width:Xpx;height:Xpx;}
#article-single .bd .category .ico{background:url(Link icon) no-repeat;width:Xpx;height:Ypx;}
|
12/ Tạo hiệu ứng
động,thay màu tên module “khách mới vào”
|
<style>
#widget-recentVisitor .bd {background:url(link ảnh động);border-color:#Mã_màu_viền;border-style:ridge;border-width:1.5px;}
#widget-recentVisitor .bd .nickname{color:#Mã_màu;}
</style>
|
13/ Tạo hiệu ứng
động,thay màu tên module “blog yêu thích”
|
<style.
#widget-followingList .bd {background:url(Link ảnh động);border-color:#Mã_màu_viền;border-style:ridge;border-width:1.5px;}
#widget-followingList .bd .nickname{color:#
Mã_màu_chữ;}
</style>
|
14/ Thay nền ô
comment
|
<style>
#comment-form-wrapper
#comment-form{background:url(Link_ảnh_làm_nền)
85% top no-repeat;height:155px
</style>
|
15/ Thay hình mặt cười
trong ô comment
|
<style>
.emoticon{display:block;height:Ypx;width:Xpx;margin-bottom:3px;cursor:pointer;background:url("Link_ảnh_làm_icon");
display:inline-block;zoom:1;float:left;margin-left:7px;}
</style>
|
16/ Thay màu chữ, đổi
hình nền ô khách comment
|
<style>
#article-supplement{ background:url(Link hình nền) repeat;color:#Mã _màu_chữ;font-size:Xpx;}
</style>
|
Hình nền
repeat hay no-repeat tùy bạn nhé!
17/ Thay font,size,nền ô
trả lời comment
|
<style>
#comment-list .comment-reply {background:url(Link hình nền);font-style:italic;color:#Mã_màu_chữ;font-family:Mã_phông;font-size:Xpx;font-weight:normal;text-align:left;letter-spacing:0.5pt;}
</style>
|
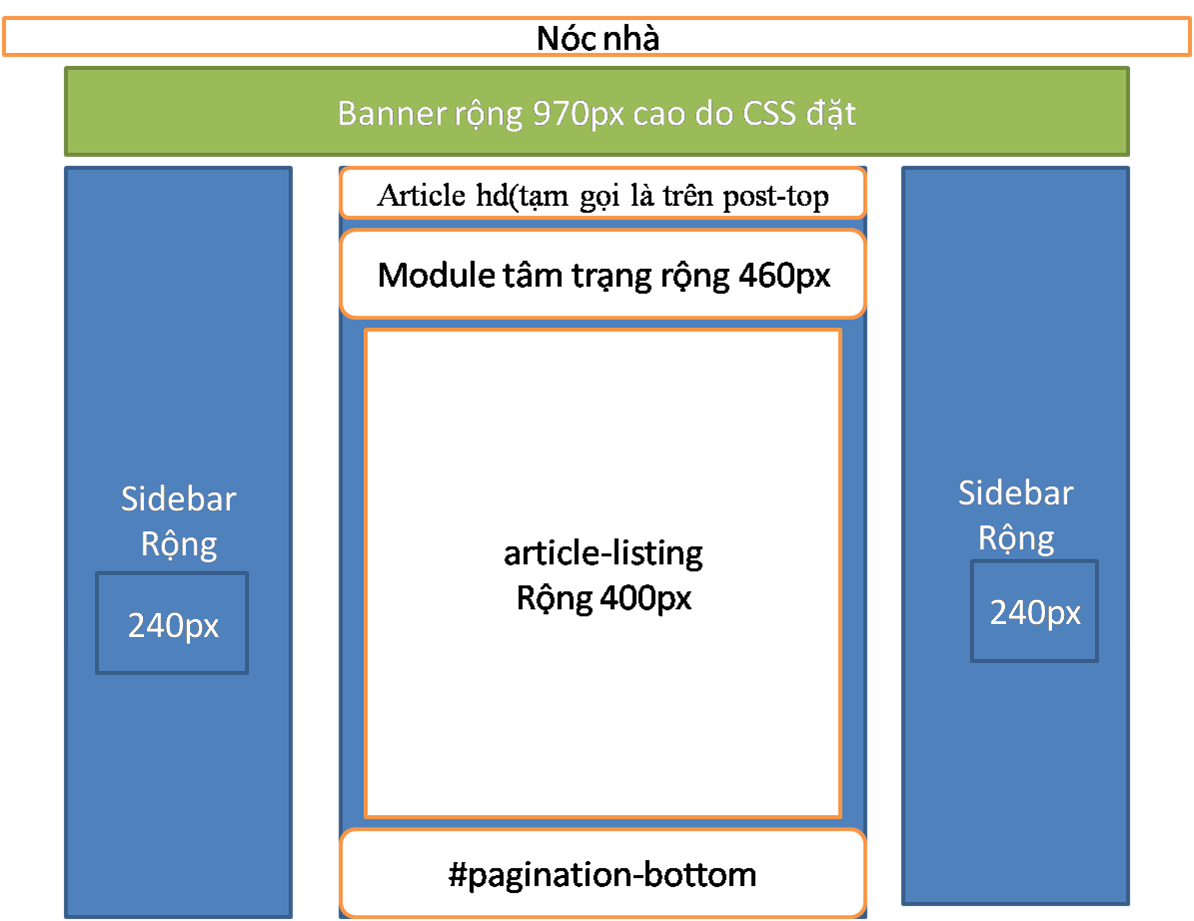
18/ Thay nền ô tâm trạng
và post-top
Mình update
lại code. Chỉ bỏ hình tâm trạng mà giữ lại module để chèn ảnh cho
đẹp.
|
<style>
#article-top-nav {background:url(Link ảnh post-top) no-repeat;height:Ypx;}
#emotion-carousel {background:url(link nền ô tâm trạng) no-repeat;height:Ypx;}
.emotion-content{display:none;}
#emotion-carousel .emotion-nav a
{height:0px;}
</style>
|
19/ Xóa cập nhật ngày
viết bài, giờ khách comment
|
<style>
#widget-recentPost li time{font-size:0px;}
#widget-recentComment li time{font-size:0px;}
</style>
|
20/ Thay nền module phía
trên ô tâm trạng
Phần
chứa ảnh của mình và các bạn mình đầu blog
|
<style>
#article-listing .article-listing-hd
{background:url(Link ảnh) no-repeat
center;height:Ypx;}
</style>
|
21/ Ngăn dòng bài
viết:
|
<style>
#article-listing
.article{border-top:hidden;background:url(Link
ảnh) no-repeat bottom center;}
</style>
|
22/ Đổi màu chữ khi đã
click vào link
|
<style>
a:visited{color:#Mã_màu_chữ;text-decoration:none;}
</style>
|
23/ Tạo hiệu ứng khi dê
chuột vào link
|
<style>
a:hover{text-decoration:none;color:#Mã_màu_chữ;font-weight:bold;FONT-SIZE:Xpx;FONT-WEIGHT:bold;text-shadow:2px 2px 2px
#f1cdf8;background-image:url(Link ảnh
động);}
</style>
|
24/ Hiện ảnh khi dê chuột
vào bài viết
|
<style>
#article-listing .bd:hover {background:url(link ảnh) no-repeat;}
</style>
|
25/ Đổi màu chữ, làm nhấp
nháy tiêu đề bài viết
|
<style>
#article-single
.article .title{font-size:Xpx;text-align:center;color:#Mã_màu_chữ;text-decoration:blink;}
#article-list
.article .title{font-size:Xpx;text-align:center;color:#Mã_màu_chữ;text-decoration:blink;}
</style>
|
26/ Tạo tuyết rơi toàn
blog
Hoàn
toàn có thể thay bằng link khác
|
<style>
body{background:transparent
url(http://www.fileden.com/files/2012/4/1/3286038/aaaaaaaaaaa.gif) top center
fixed;}
</style>
|
27/ Tạo khung cho các
module
|
<style>#widget-statistic .bd , #widget-recentPost
.bd , #widget-category .bd {background:url(Link ảnh
nền);}</style>
|
28/Tạo ảnh nền module
nguồn bên ngoài
|
<style>
#widget-externalSource {background:url(Link Ảnh nền); #MÃ MÀU
CHỮ;}
#widget-external source .bd
{background:url(Link ảnh nền); }
</style>
|
29/ Tạo viền cho
blog
|
<style>.cover-container,
#article-top-nav, #article-list, .cover-template, #pagination-bottom, .sidebar,
#article-single, #article-listing, #article-supplement, #comment-form,
#article-supplement.new-style-supplement, #comment-form, .photos-page .bd,
.photos-page .ft, .albums-page .bd, .albums-page .ft, #article-single .article
.title, #article-list .article .title, #article-single .actions,
#photo-list-header{border-color:#Mã_màu_viền;border-style:kiểu_viền;border-width:Xpx;}</style>
|
|
Boder style gồm:
1 none
2 hidden
3 dotted
4 dashed
5 solid
6 double
7 groove
8 ridge
9 inset
10 outset
|
Boder-width:1>4
1 thin
2 medium
3 thick
4
length
|
30/ thay nền cho thanh
menu: ( chỗ chú cún của
ken)
Mọi
người lấy lun chú cún của ken rồi thay cái khác zô nha
|
<style>
#asb-menu
ul{border:none;background:url(http://i1139.photobucket.com/albums/n544/tome18/1086753kxnaom8foj.gif?t=1334471305)
no-repeat right center;height:98px;border-width:0px;}
</style>
|
31/ thay icon mục hồ sơ của tôi.
Ken đưa lun code của ken mọi người thay icon thích lấy
luôn cũng được. thay icon nhỏ thôi
|
<style>
#w-profile-card
.profile
.ico{background:url(http://i110.photobucket.com/albums/n110/yanyancatphoto/b412498d.gif)
no-repeat center;}
</style>
|
32/ ngăn dòng comment:
|
<style>
#comment-list .comment-item{background:url(Link_ảnh_ngăn_dòng) center bottom no-repeat;border:0px
none transparent;}
</style>
|
33/ Đổi nền nút bấm “ đăng”
Lấy
cái ảnh nhỏ thôi các bạn vì diện tích chữ đăng ko to đâu bạn
|
<style>
#comment-form span.yut-btn{background:url(Link ảnh) center no-repeat;border:0px none
transparent;}
</style>
|
Ai
muốn xóa luôn chữ “ đăng” lấy code này ko dùng code trên nữa
|
<style>
#comment-form span.yut-btn{background:url(Link_ảnh_nền) center no-repeat;border:0px none
transparent;}
#comment-form .sm{color:transparent;}
</style>
|
34/ Hiệu ứng trả lời comment khi dê
chuột
|
<style>
.reply-history .reply-list
.comment-item:hover{background:url(Link_ảnh)
no-repeat center top !important;
border-color:#FF0080;border-style:groove;border-width:1px;}
</style>
|
35/ Làm trong suốt ô tổng số bài
viết
Cái
ô này ở cuối list danh sách bài viết các bạn bấm vào để next trang
sau
Code sẽ giúp các bạn chỉ còn nhìn thấy số. rất
đẹp
Chữ: papyrus là font chữ kiểu thư pháp, các bạn có thể
đổi thành font của mình
#FF0040 là mã màu chữ, mọi người có thể thay.
|
<style>
.yut-pg-container .pg-previous,
.yut-pg-container .pg-next, .yut-pg-container .pg-page, .yut-pg-container
.pg-current-page, .yut-pg-container .pg-break
{background:none;border-width:0px;font-size:18px;font-family:papyrus;color:#FF0040;}
</style>
|
36/ thay chân post-top
Nếu các bạn để ý sẽ thấy dưới ảnh ở mục post-top có chữ
“xem trước”
Code sẽ tạo hiệu ứng cho nó. Lấy luôn link ảnh của ken
cũng được
|
<style>
#article-top-nav .ft .action-carousel-show,
#article-carousel .ft .action-carousel-hide {background:url(http://i990.photobucket.com/albums/af30/happy_holiday886/1438108532.gif)
no-repeat center;}
</style>
|
37/ Code tạo nội quy
comment.
Các
bạn sẽ làm 1 cái ảnh ghi nội quy zô đó. Upload nên trang ảnh nào đó lấy link và
size chiều cao nhé
Bạn
nào ko thích mà chỉ thích làm đẹp thì lấy 1 cái ảnh động vậy
Các thong số của boder các bạn có thể đổi
Y
là chiều cao của ảnh
Code
|
<style>
#ygubcmt .ft {background-image:url(link_ảnh);height:Ypx;border: 2px ouset #DF01D7;}
</style>
|
38/ Hiệu ứng emoticon
Emoticon là hình mặt cười trong khung comment bấm zô sẽ
ra các icon yahoo chèn vào comment
Mục
số 15/ ken đã hướng dẫn thay icon này.
Lần
này ken sẽ cho code tạo hiệu ứng cho nó ( hiệu ứng của hiệu ứng :x)
Các bạn thấy bình thường khung comment của ken có 1 con
khỉ, nhưng dê chuột zô lại ra 1 con khỉ khác.
Đó là hiệu ứng cho nó
|
<style>
.emoticon:hover{display:block;height:Ypx;width:Xpx;margin-bottom:3px;cursor:pointer;background:url("Link_ảnh");display:inline-block;zoom:1;float:left;margin-left:7px;}
</style>
|
Y là chiều cao của emoticon hay gọi là icon cũng
đc tầm 30>> 50
X
là chiều rộng tầm 30>>50
39/ Tạo chữ ký bằng ảnh cho
blog.
|
<style>
#article-single .article-ft {background:url(Link_ảnh) no-repeat right;height:Xpx;}
</style>
|
40/ Tạo viền chấm vàng cho body
của blog
|
<style>
body
{border-left:10px dotted #EAFA03;border-right:10px dotted
#EAFA03;border-top:10px dotted
#EAFA03;border-bottom-width:10px;border-bottom-style:dotted;border-bottom-color:#EAFA03;}
</style>
|
41/ Đổi icon phần đếm số
comment
|
<style>
#article-single .comment-count
.ico{background:url(link_icon)
no-repeat;width:Xpx;height:Ypx;}
</style>
|
42/ Thay nền ô trả lời
comment
Mình đưa code các bạn tùy biến border và link ảnh
nhé
|
<style>
.new-style-supplement #comment-list .reply-container
{
background:url(link_ảnh_nền) no-repeat
top;border-color:#B2F00A;border-style:outset;border-width:3px;}
.three-col #comment-list .reply-container textarea
{background:url(http://www.laymark.com/l/m/m048.gif) no-repeat bottom
right;color:purple;font-size:16px;border:0px none
transparent!important;}
</style>
|
43/ Xóa hiện thờ gian
comment
|
<style>
#comment-list
.comment-content .meta .time {font-size:0px;}
<style>
|
44/ Đổi màu số đếm trong module “
Nhóm”
|
<style>
#widget-category li em{color:#mã_màu;}
</style>
|
45/ Thay ảnh đại diện bài viết bằng ảnh của
bạn.
Thay vì bạn để ảnh mặc định là ảnh đầu tiên trong entry
thì bạn thay bằng ảnh của bạn. bạn nhớ resize ảnh để tầm 120x120 là đẹp
nhé
|
<style>
#article-listing .img-wrap img
{height:0px;width:0px;}
#article-listing .img-wrap {float:left;width:Xpx;background:transparent url(Link_ảnh_đại_diện) no-repeat
center!important;height:Ypx;border-color:#mã_màu_viền;border-style:outset;border-width:4px;}
</style>
|
46/ Đổi icon cho phần tag của bài
viết
|
<style>
.article .tag .ico
{background:url(http://i118.photobucket.com/albums/o93/olympia41124/Yahoo_360plus/Icon/15.gif)
no-repeat;width:20px;height:11px;}
</style>
|
47/Tạo khung khi dê chuột vào nội dung
comment và trả lời comment
|
<style>
#comment-list .comment-content
.content:hover {border:1px groove #FF0080;}
</style>
|
48/ Option xem thông tin người vào comment
Đổi nền, viền….
|
<style>
OPTION{}
#profilecard-hover .dd-menu {background:black;border:1px
groove #FF0080;}
#profilecard-hover .dd-menu
.gender{color:#F2F5A9;}
#profilecard-hover .dd-menu .action-change
.following-status {color:#FF0040;}
#profilecard-hover .dd-menu .link
{border:1px groove #FF0080;}
.yui-skin-sam .yui-panel {background:black;border:4px
outset #D0FA58;}
#dialog-following .hd
{background:black;color:#00FFFF;border:1px groove #FF0080;}
#dialog-following .bd
{background:black;color:blue;border:1px groove #FF0080;}
#dialog-following .ft
{background:black;color:blue;border:1px groove #FF0080;}
#dialog-following-setting .hd
{background:black;color:#00FFFF;border:1px groove #FF0080;}
#dialog-following-setting
.bd{background:black;color:blue;border:1px groove #FF0080;}
#dialog-following-setting
.ft{background:black;color:blue;border:1px groove #FF0080;}
</style>
|
Không có nhận xét nào:
Đăng nhận xét